Monday, February 4, 2013

Fire Department Harness Part 3: Harness Design

My latest model harness is a fire department team for a steam pumper, circa 1900.  There was no standardized "fire department harness", although they usually had the following parts:

Historic fire department harness with pumper engine, photo from http://www.bakersfieldcity.us/fire/bfd_history/HistoricalHORSES.htm
  • "Quick hitch" collar.  These were invented by a firefighter and greatly reduced harnessing time.  The hames are permanently attached; the collar opens with a latch at the bottom and has a hinge at the top (over the withers).  As far as I can tell, they were only used for fire horses.  This collar and the bridles used are the main differences between fire harness and regular harness.
  • "Express" harness.  This was a standard streamlined style of work harness used by expressmen/deliverymen, made for easy harnessing but without sacrificing pulling power.  Girths are optional (they attach to dees on the traces) and cruppers are not used.
  • Reins (and girths, if used) clipped on instead of buckled.
  • Bridles were often some kind of halter-bridle, or had clip-on bits.  Some fire departments' horses wore more normal bridles around the clock; they had to be taken off when the horses were fed grain, which could cause problems if there was an alarm during mealtime.
  • NO blinkers.  This was a safety concern.  Horses had to be able to see to navigate through traffic at high speeds on their own.
  • If more than two horses were needed to pull a vehicle, the usual hitch was three horses abreast to keep the hitch compact for city driving.  The reins buckled together so that the driver only had one right and left rein to hold.
  • Brass hardware and black leather seems to be standard.  Firefighters took great pride in keeping their horses, harnesses, and vehicles polished and in top shape.  Vehicles were usually ornately pinstriped and gold leafed.  
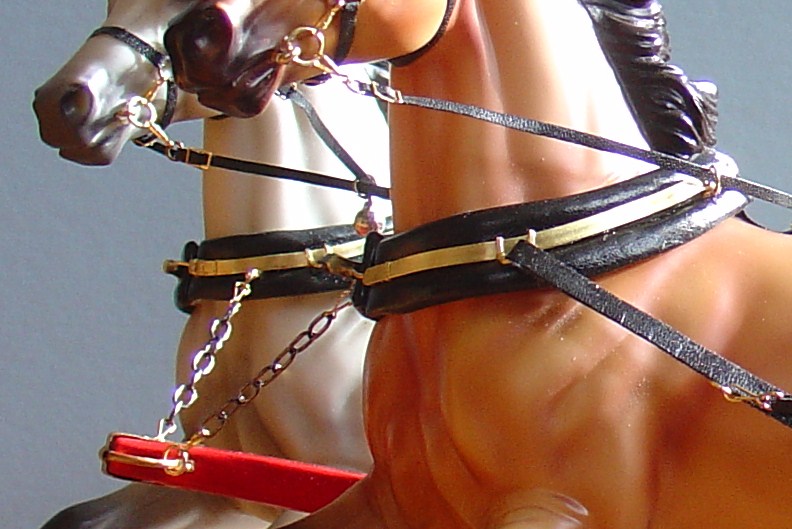
Fire harness with clip on girth and halter style bridle.  Photo from an online auction.
 Optional items include leather fly fringe browbands, and leather fly fringe "blankets" or wool blankets could be brought along to keep the horses comfortable once they were at the fire.  Lead ropes were probably stowed in the vehicle.  Dogs (any breed, not just Dalmatians) were sometimes used, as companions and mascots or to clear stray dogs out of the path of the horses.

So, after looking at various fire harnesses, I chose some of the most common features.  Most of the photos I found had similar harnesses; there was more variation in the bridles.  I chose a simple halter-bridle where the bit clipped directly to the halter rings.


The harness was made with leather and buckles from Rio Rondo; jump rings, wire for the buckle tongues, and chain from the craft store; brass strips from a local hobby shop; twine and cardboard found around the house; and bits and clips from twmhc ebay store, which I hadn't used before.  The fire engine is a Jim Beam bottle from ebay, with some wool fluffed up for the steam and a removable wood tongue made by myself.


Next week, the final post in the fire horse series will cover some of the history of fire horses.

Tuesday, January 29, 2013

Fire Department Harness Part 2: Hames...and finished!

First of all, I'm going to try a new blogging schedule, which will hopefully be more consistent: new posts will be once a week on Mondays - for now at least.
And here it is: at long last, a finished project!  This is a harness for use by a fire department circa 1905.  My next post will be a bit of history and more information on the design of these harnesses.  The biggest difference from a normal harness is in the design of the hinged collars with attached hames.

In Part One, I showed how I made the collars themselves.  The hames, though, were the really tricky part.  They were made from brass strips, jump rings, wire, sewing pins, and gold thread.  They are attached permanently to the collars.

The main part of the hames were shaped by bending with two sets of smooth-jawed pliers, a difficult task as they have to bend along the width as well as the length.  I did try hammering them on a small anvil, but in the end careful bending with the pliers worked best.
 Next, I punched some holes in the hames.  The way to do this without a drill is to pound a nail (of a metal harder than the brass!) carefully through the strip.  Hold the nail with a pliers and place the brass strip on a scrap piece of wood, then hammer away.  Be careful to keep the nail centered on the brass.  Eventually you will get a small hole.
The hole can be widened and smoothed out with a round file.  I also used a flat file to get rid of the burr on the back side of the hole.  There is a small hole on the top of each hame and a larger hole (for the latch) on the bottom of the right hand side.
 All sharp edges are rounded off with a file and sandpaper.  The hames were then lightly sanded with very fine sandpaper (600 grit) and rubbed down to remove any tarnish.  Craft brass will tarnish fairly easily and  fingerprints may show up much later if not cleaned off.
 First, I had to peel off the chamois lining from the back of the collars, as I had gotten ahead of myself.  Then, the hames were attached at the top by a sewing pin bent at the top and pushed all the way through the collar.  The pin is drawn all the way through and the end trimmed short, to create a sort of rivet.  If you've ever made a Rio Rondo kit saddle, it's exactly the same idea.  The small rectangle of chamois in the picture below is covering the end of the pin, for extra security and protection for the horse.


Using a round-nose pliers, I made a series of rings with long ends out of wire - you can see two of them in the upper right corner.  I made holes in the collar (hidden under the hames) with a large sewing needle, then pushed the wire through and attached jump rings.  This made the collar terrets for the reins, and the ring to attach the pole chain (seen here with a lanyard hook attached).  The left hand side of the collar has a piece of wire attached under the hames for the collar latch.  Thinner flat brass strip was used for the trace attachment.  The ends go through the collar and bend flat on the back as with the other parts.  It is also sewn in place with a few loops of gold thread.  The lower ends of the hames are sewn down as well.  Then the chamois lining was glued back in to cover everything.  I rubbed down the brass one more time, and coated the whole thing with clear leather sealant to keep it from tarnishing.
The collars close by passing the wire from the right hand side through the hole in the left hand hame.  The wire has a bend in the end to hook the latch.

The best part of this harness is that it works exactly like the real thing: it is ridiculously fast to put on!  Simply slide the breeching under the tail, and hook the collar closed.  Everything else can be adjusted ahead of time.  I'd even leave it attached to the vehicle, except that the bridles are hard to buckle if left til last.  The pole chains and trace chains all have working clips, so everything snaps together.

Next week: history and design of fire department harnesses!

Monday, January 14, 2013

New Year, Old Projects: Continuing the Fire Engine

Today, I actually got something model-horse-related done.  It still needs paint, but I finished building a tongue for my Traditional scale fire engine.
The engine itself is actually a Jim Beam bottle, so the tongue had to be removable.  In the end, I just cut a notch in the tongue with a round file and made a hinge with a piece of brass strip to hold it in place on the axle.

The doubletree is a piece of the same 1/4 inch square strip as the tongue, but I used the table sander to cut it down to half the thickness.  This isn't really a good idea - I sanded two fingernails off - but hey, I didn't have to use a saw or go out and buy another pre-cut strip of wood.  It's held on by two small nails and a piece of aluminum sheet.
The singletrees are made with 1/8 inch strip, and were rounded off a bit by hand-sanding and an X-acto knife.  The rest of the hardware is made of gold wire and jump rings.  The holes were drilled by hand with a pin drill.  I don't use power tools for model horse projects much, because hand tools are usually easier or better suited for what I'm trying to do.  Not safer, though.  My worst tool injuries have been with hacksaws, hammers, and X-acto knives.  Just because it doesn't have a motor doesn't mean you can let your guard down!
The front end of the tongue was carved and sanded down to a smaller point.  The round piece that goes side to side is aluminum tube, pressed flat on the ends and center.  It's held on by "nails" (cut-off sewing pins) on each end and a brass strip that goes top to bottom, also attached with sewing pins.  Instead of trying to drill a hole in the brass strip, I hammer a small nail in just far enough to punch all the way through.  The sewing pins then fit nicely into the small hole.  Two mini lanyard clips are attached with jump rings to hold the collar chains.

The wood will be painted red, and the silver metal will be either black or gold.  Now I just have to finish the hames for the harness - I can't put them off any longer!

Wednesday, September 12, 2012

Fire Department Harness Part 1: Collar

To be honest, I've always made breastcollar harnesses because I only recently figured out how collars are supposed to work, let alone how they're constructed.  So, for my very first set of Traditional scale collars, I'm making a historic fire department harness.  Fire department collars are not like normal collars- they hinge at the top and snap closed on the bottom, and the hames are permanently attached.  I have not been able to find a decent picture of the top side of the hinge, but I need to make a cutout to fit the manes of the intended horses anyway, so I can get around that for now.

I'll have more information about real fire horses in a later post, but here's how I made the collar.  The same concept could be used to make a normal harness collar- it would just be made in one piece, and open at the top instead.

First, I made a paper pattern and a felt copy to fit it to the horse.  (shown here with most of the rest of the harness)


 From left to right: 1. cardboard pattern piece with twine glued on (for padding).  2.thin cowhide leather pressed into and glued in the center gap.  3. leather wrapped over and glued onto the bottom  4. final piece bent into shape.

Same thing, from the back side.

The two pieces are hinged at the top with a piece of 1/4 inch leather lace (to fit under the mane, bottom) and one end of the back strap is glued onto that (top).

The inside of the collar is lined with chamois cut slightly smaller than the cardboard piece.  I don't think the real ones were lined, but this covers the edges of the leather and protects the model.  It is not visible when the collar is on.

 
 Collar on the horse.
Front opening of the collar. This will close with a latch on the end of the hames.
 Top of collar with cutout for the mane.

The hames will attach permanently inside the collar's groove.  They will be made of bent brass strips.

And that's the collar!

Saturday, May 26, 2012

Valemon in Progress

I have several better posts in the works, including a wagon building how-to that hopefully will be up soon.  But for now, here's a quick look at Valemon, my next Fjord in progress.

OF pony, dremeled pony, Valemon
I'm trying a few new things with Valemon.  Previously, I've done two repaint only G3 Ponies to Fjords, and two neck-and-hair-only remakes.  Valemon has a new neck, new ears, new mane and tail, a reshaped belly, and larger jowls.  His forehead was thickened, though it's hard to tell under the mane.  I also filled in his muscles, as Fjords don't usually have that much muscle definition.  At least, the ones I know are pretty chunky.

Valemon (as of yesterday afternoon, he now has ears and a better mane) and an OF pony.  I'm hoping to get him pasteled this weekend, but we shall see.  Anyway, more fun posts coming soonish!

Sunday, March 25, 2012

White "Sea Horses"

Google Translate is pretty awesome.  With it, I can read Norwegian forums about Norwegian Fjord Horses...even though I only speak about 10 words of Norwegian.  The problem is that it's just a computer program, so sometimes you get odd translation errors.  "Fjordhest" - Fjord Horse - sometimes gets translated as Sea Horse.  :)

Most Fjords are "brunblakk" - bay dun - but they also come in several other colors: "rodblakk" - chestnut dun, "gra" - black dun, "ulsblakk" - buckskin dun, and "gulblakk" - palomino dun.  Most breed references will tell you that these are the 5 accepted colors of Fjord Horses.  You can see pictures and explanations here: http://www.bluebirdlane.com/the-colours-of-the-norwegian-fjordhorse.html

HOWEVER....there is one more extremely rare color.  Kvit.

 "Kvit" means white, and actually covers three colors: perlino dun, cremello dun, and smoky black dun.  All of these colors are double dilutes, meaning they have two cream genes.  For example, a horse with a bay base color with one cream gene will become buckskin.  Two cream genes will make it perlino.  To get a double dilute, both parents must carry the cream gene, so a kvit Fjord must have parents that are either ulsblakk, gulblakk, or possibly gra (all fairly rare colors at present).  A brunblakk or rodblakk Fjord cannot have a kvit foal.  Double dilute horses have blue eyes and lighter skin.  They are not albinos.  Albinism is a lack of pigment; double dilutes simply have lightened pigment.  Dun factor markings (or white markings, in other breeds) are usually still visible, just very pale.
As in many breeds, traditionally, blue eyed horses were not favored, and so they were selected against.  But genetically, kvit is a normal color resulting from breeding Fjords with accepted colors.  Kvit Fjords are registerable, though there is enough bias still that the color is usually not intentionally bred.
 In a perlino dun Fjord, the dun factor markings will be a darker yellowish color.  Most of these pictures are of a perlino dun mare named Fia.  A cremello dun Fjord will likely have very indistinct cream colored markings, if visible at all.  I have not found any photos of a smoky black dun Fjord.

 If you look closely, you can see the very distinct yellow dorsal stripe in Fia's mane, and that her tail is mostly yellow with white "frosting".
 This last horse is listed as a gulblakk, but is pale enough in this picture that he looks similar to what a cremello dun should look like.  A cremello would have a pinker nose, though.

The following pictures are not of Fjords, but of other perlinos and perlino duns, to better show what dun factor markings look like on a perlino.

Perlino blue eye with flecks of green

Perlino Dole Trotter.  Another Norwegian breed, this is how dark a perlino's mane and tail are without the dun frosting.

Perlino dun

Dorsal stripe on perlino dun

Leg barring on perlino dun

Another perlino dun.
I hope you enjoyed this look at a very rare color!  None of these photos are mine, and unfortunately I'm not sure exactly where I got them.  I've posted them simply for educational purposes.  If the owners of these photos don't want them on here, I'm happy to take them down if they request.

Thursday, March 8, 2012

Nirvana's Tack

Western Pleasure classes drive me crazy.  Peanut-rolling horses, sparkly saddles, and trendy show outfits: they annoy me.  Maybe I never noticed this back when I was showing in 4-H, because I was just happy to be on a horse (ah, horseless horse 4-H...I once showed a pony that I had never seen before I was tacking it up for the show...did not go well), but we always showed in the same crappy saddles we trained in.  I did have a "show" shirt (it had horses and fringes on it!) and a rather pathetic hat that wouldn't hold its shape, but the closest I ever got to matching was that navy blue shirt and one pony's bright blue nylon bridle.  And I didn't care.  That fringed shirt that my mom made was COOL.  Just About Horses magazine had a picture of Marguerite Henry wearing a vest made out of the same material!

The model horse Nirvana actually got started because I wanted to make a miniature copy of the real horse's tack.  It's completely trashed, probably close to 20 years old, and it's the most comfortable saddle I've ever ridden in.  I do see the allure of making fantastic model saddles that you could never afford in real life, but for this one I wanted to do an homage to the crappy every day saddles that nobody ever copies in miniature.


Nirvana is a trail horse at a camp, so he always wears a halter.  The barn has tie stalls, and it's safer and faster to leave it on, since the horses may go out once an hour.  Plus, the lead and tail horses usually wear lead ropes on the trail, so that the wrangler doesn't have to carry so many in case of emergencies.

Edgar is modeling, as model Nirvana is still not f

inished.
Nirvana needs his forelock brushed.  Again.


His bridle is plain brown leather, with faded blue nylon reins.  The tack at camp is cobbled together from donations, and is based on whatever works for the horse.  A horse that was trained for English riding may end up with a snaffle bit and English reins on a Western bridle.  And of course, split reins are always tied together.  Like almost every Western bridle I've ever ridden in.  You know, the way you're not supposed to for showing.  :)  Amazingly, Rio Rondo had a bit that matched almost exactly (just a little fancier).

I have to thank Braymere Custom Saddlery's tack tips for helping make this one of my best bridles.  I skived all the leather, punched holes using a mechanical pencil, made real tongue buckles, and sealed the leather based on her instructions.  On the browband, the cheek pieces and throatlatch are separated by a leather lace that is threaded back on itself to make sort of a braided knot.

I was actually at camp for a friend's wedding, and snuck out to the barn...hence the jewelry.
The saddle is a nylon and leather saddle with silver lacing.  I'm sure it was nice at one point...now the outer fabric layer is threadbare and torn, exposing the plastic-y layer underneath.  On the model saddle, I sewed a layer of fabric onto a pleather layer and edged it with ribbon.  Then, the fabric was aged using sand paper, slashing with the back side of an X-acto knife, and "dirtied" with many light washes of watercolor paint and a dusting of chalk pastels.  The conchos were domed using a technique from Rio Rondo's website and colored over with black Sharpie marker, then wiped off unevenly to look tarnished.  They were glued onto leather conchos which had been sewn onto the saddle.


I used a Rio Rondo resin saddle tree, but sanded the horn smaller and figured out a better way to cover it than their instructions.  Basically, I cut one piece of skiver with the seam up the center front.  To match the color, I used a piece of the same skiver on the cantle, and lined it with tooling leather for stiffness.  All of the leather was aged with sandpaper in places where the real saddle had worn.  In the picture below, you can just see the wear leather at the top of the fender.  These are fully adjustable stirrups (though with regular buckles, I didn't want to deal with miniature Blevins buckles!)


 This method of "tying" the lead rope comes from a camp wrangler.  It's just a loop of rope threaded through the hole in the saddle, and hooked over the horn.  It keeps the horn free for a hand-hold, and comes loose quickly in an emergency, but doesn't slide loose on its own.  The tapaderos make this saddle unusable for most show events, but much safer for trail rides.  The rivets are made from straight pins.
 

The blanket is pretty straight-forward: a wool blanket with synthetic wear strips.  This was made with craft felt and the same pleather as the saddle, but with the fleecy underside peeled off.  (Of course, the day I took most of the pictures, someone had used a different blanket.  But you can see the normal gray one in the first picture.)  I left off the tape labels, as I didn't think I could write that small.

So that's my homage to the sort of tack I've always ridden in.  It isn't a pretty set of tack, and doesn't do very well in tack shows, but I like it.  :)