Sunday, January 15, 2012

Lazy Weekend...

Well, yesterday I intended to get on the computer only to print off some more reference photos for Nirvana, and ended up never getting around to actually doing anything with him.  Or printing the pictures.  So, in an attempt to make my procrastination productive, here's some photos from last fall.  I had the chance to visit the Minnesota State Fair, and I took a few pictures of a jumper class.  It seemed to be an adult class jump off, but I'm not sure as I missed the beginning.

Horse has just passed the timers to start the round.
 I have occasionally seen comments on model horse photo shows from judges about "jump is too close to fence".  Well, at this show there were three fences up against the arena wall.  Each of them was perpendicular to the wall.  You probably wouldn't want to do this with anything other than a solid wall, but feel free to use this as a reference next time you're running out of space for your photo setup.
 I wish I could remember which fences were # 1 and 2.  #1 may have been the dark green and white fence in the center.  3 is the green and white fan, 4 is the yellow, 5 I believe was the reddish "brick" one...
 #6 is the white picket fence, 7 and 8 are the brown with purple flower boxes along the far wall, and I don't remember how the numbering went after that.
 The blue and white jumps were a combination.
Action shot.  Unfortunately, this was the best one.

And on a slightly more random note, a week or two later, I saw this Amish buggy tied up across the street from a gas station in a small town.
You gotta get the boat to the river somehow!

Thursday, January 12, 2012

Nirvana: Part 3

This is Nirvana in his current state:
All of the epoxy fingerprints have been sanded off, and his neck has been sanded a bit.  He will need more sanding with a finer grit paper to define the muscles better.  His right front leg was straightened, hooves were filed down, and a peg added.  He can stand, even on this upholstered piano bench!

I used a heat gun (paint stripper) with a narrow funnel end to bend his leg.  The low heat setting worked fine.  I heated the bent area just above the knee, moving the heat gun around all sides until it would bend.  It was a weird place for the leg to be bent, but it seemed like the best way to fix the leg.  He does have a slight "noodle bone" now but it should be easily fixed with some epoxy.
Leg was bent slightly outward just above the knee.
Then, into a bucket of water to cool and set.
Make sure the bucket is big enough to actually submerge the moved area...

Then, I filed down his hooves to the correct shape.  I check them by setting the raised hooves flat against the edge of the table, as it's easier to see shape problems when they're "on the ground".
Just like the real thing.  Miniature farrier!
Before
After
His front hooves, however still need more work and I'll have to add epoxy to fix them.  But I decided to add the peg now anyway, so he can stand.  I may have to move it later, but I'm tired of him falling over.
 
 It's really easy.  First, drill a small hole with a pin drill.  These are cheap and available from the woodworking section of most craft/hobby stores.  It's basically like an X-acto blade handle with tiny drill bits.  If the hole is the same size as your plastic rod you won't need any glue.
 Then, insert a short section of plastic rod.  I got these from the local model train/hobby shop.  I used the blue 1/16" rod on Nirvana, as he doesn't need much support, and the narrow rod is inconspicuous.  If the rod was longer or holding more weight, I might go for the thicker rod.
 
 The larger 1/8" rod is what I use on custom Stablemate jumpers.  It does bend if it's a long piece such as the pegasus here, but for an average jumper it doesn't.  And with the right lighting, the clear rod just disappears.
Even though the rod is fluorescent blue (the model shop didn't have clear 1/16") it isn't very noticeable.  Now I just have to borrow a Dremel, and then I can finish his poor lame front feet in the next round of epoxy.

Wednesday, January 11, 2012

Nirvana: Part 2

I've finally gotten to the second side of Nirvana's neck.  I started the first side back in December....but anyhoo.  This side only took about 2 hours.  I'm sure it will need some more work, but hey, there's sort of muscles!  I'm following a technique from Don't Eat the Paint.  It's a little scary, as I've never resculpted a neck before, but her tutorial is really great.
Usually I use a hair dryer for a few minutes first.
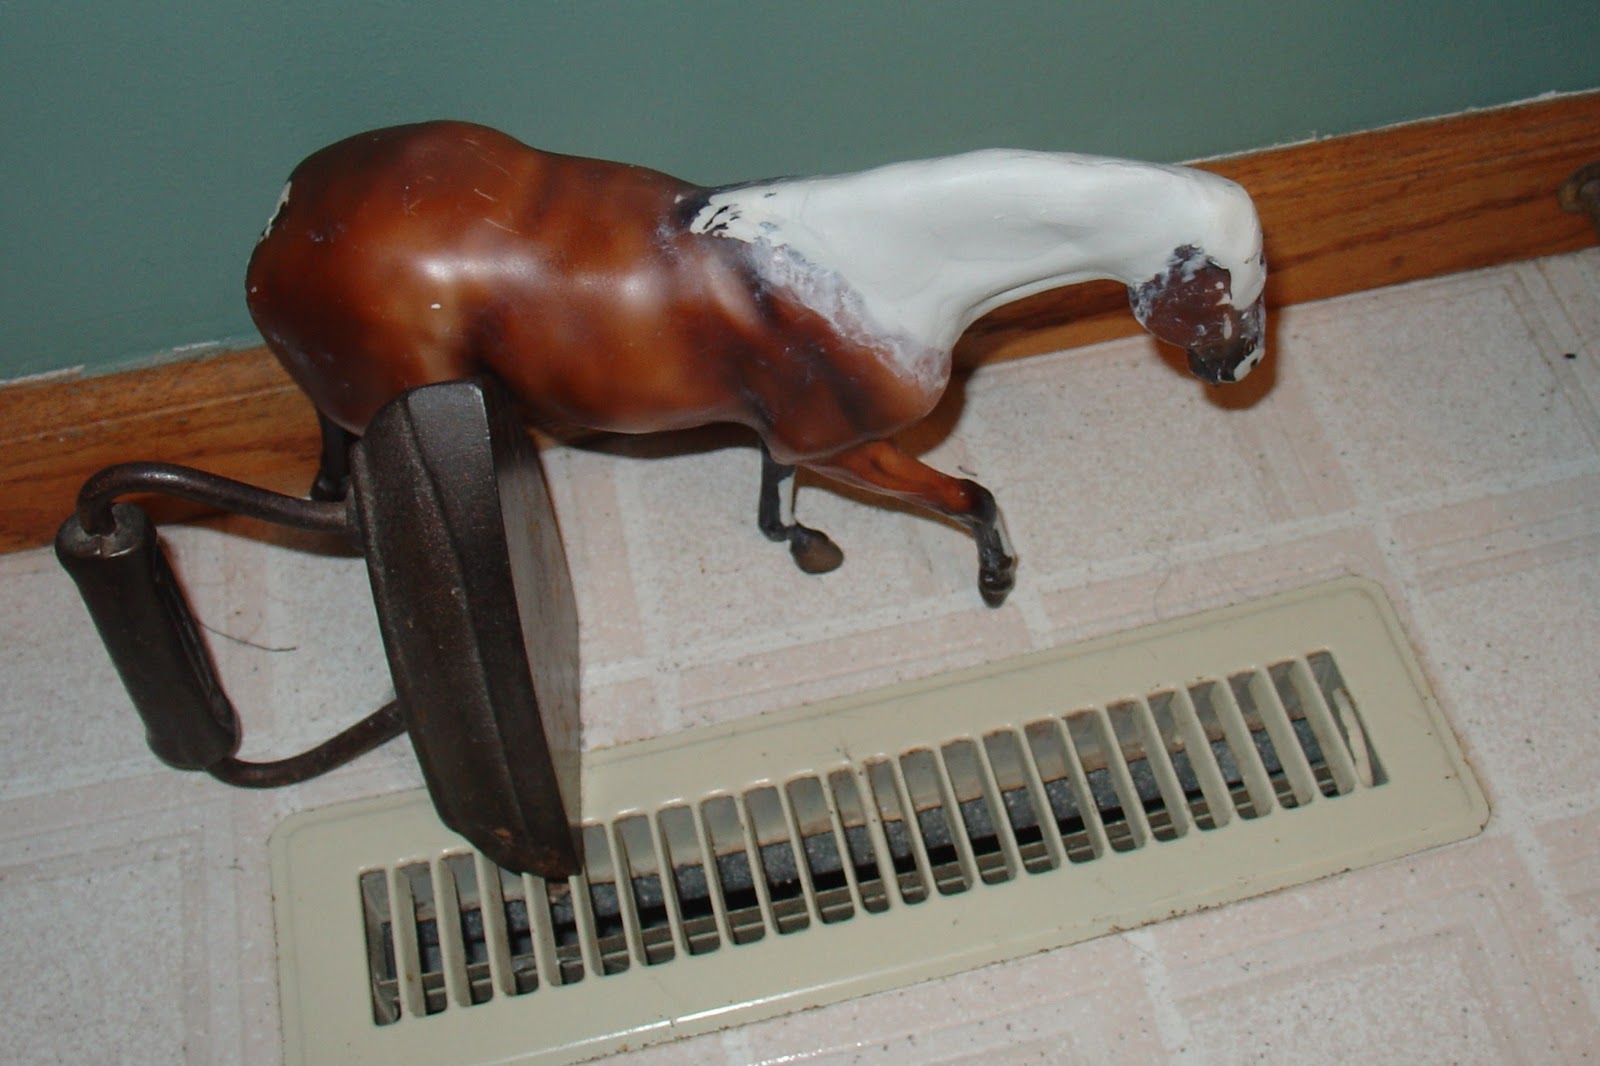
 I like to set any epoxy next to a heat vent to cure overnight.  This one's in the bathroom - small room, stays nice and toasty, and no worries about damaging the linoleum.  The iron is holding him up, as he is once again unstable.  The weight of the neck is unbalancing him again.  I started to add more epoxy to his cannon bones because the real Nirvana has chunkier legs, but the epoxy was starting to cure so I had to leave it.  And I just remembered I will have to move his right foreleg a bit anyway.  Oh well.
Normal people would fix the crooked leg first...
I also tried making some ears.  I've never done this before, so we'll see how they look when they're done.  Again, this technique is from Don't Eat the Paint.
 As for epoxy, I much prefer Apoxie Sculpt.  Gapoxio is ok, but I really hated trying to sculpt wearing gloves.  I have tiny hands, and "one size fits all" gloves don't.
Both of these are at least 3 years old.  The Apoxie Sculpt part B is starting to dry out on top but still works fine.  No idea about the unopened Gapoxio.  And this is why I never buy the big tubs, I'm usually just resculpting hair on Stablemates.
Apoxie Sculpt is available here, and Gapoxio is available from Rio Rondo.

So Nirvana has a neck again.  In the morning I'll check to make sure the epoxy set, then start sanding.  And find the heat gun and a dremel, so I can fix his leg....

Saturday, January 7, 2012

New Projects for a New Year

Now that the holidays are over, hopefully I will have time to work on horsy projects again!  Here are a few upcoming projects I will be detailing on this blog - stay tuned for more!

First: finish Nirvana - customize and paint/pastel
Part of the reason for this blog is so I actually finish him.  Poor Brego has been under construction since 1999, and remains at the bottom of the list...

2012 Traditional Scale Projects:
- 1905 fire department harness (and pumper engine)  This is coming up next!
- Brekka - custom trotting Fjord
- Pleasure harness for Brekka
- pony size English saddle and bridle
My workspace on the coffee table.

2012 Stablemate Scale Projects:
- farm harness and forecart for G4 drafters
- 4 in hand circus parade harness and copy of Ringling Bell Wagon for G3 Belgians
- western saddle and bridle
- Fjord team, work harnesses, and hayride wagon
- Tandem harness
Checking the scale of tires for the forecart and farm wagon!  Also, a half-finished Fjord.

2012 Other Projects/Topics
- sleigh bells
- scenery
- photo showing

Other Future Projects - these are all on "the want list" of things to do, subject to time and money.  If they happen, I'll post the progress here:
Trad Scale:
- pony size Albany cutter - this will include a tutorial on bending wood
- marathon brollar harness, cart, and water hazard
- forest trail scene base
- pony collar harness and wagon
- customize Stormy to Fjord foal, possibly a custom Alborozo

Classic Scale
- pony harness and cart
- working western saddle and bridle
- possible custom Gretel - silver bay, or Fjord?

Stablemate Scale
- racing sulky sleigh and harness
- sleigh or cutter
- gig or cart
- Fire harness and engine
- English saddle and bridle
- 1905 street scene with shops, street lamps, and Macadam road
- ramshackle barn
- Possible customs: chestnut Friesian, G3 Andalusian to mini Alborozo, jumper to diving horse, G2 and G3 ponies to Fjords, G4 trotting horse with new mane and tail to fit my gig, and several others.

So, those are a few projects I have in mind!  I hope they will be entertaining at least, and maybe even some useful tips for you.  Thanks and stay tuned for more!

Sunday, December 4, 2011

Nirvana - Day One

My first project will be something a little out of the ordinary for me.  This is actually only my second time repositioning a Traditional scale model (and the first one is still unfinished).  Most of my customs are Stablemates, and honestly I'm better at tack making most of the time.  So Nirvana is a bit of an experiment.  He will be a portrait horse, so let's talk about the real Nirvana.

Nirvana is a trail horse at a camp I used to work at.  He is 23 years old, and is a BLM mustang from Nevada, according to his freeze brand.  (see THIS LINK for a really nice explanation of how to read a freeze brand).  Apparently, he came directly from the range to camp and was trained at camp by a wrangler in the early ‘90s.  Like all horses, he has his quirks but he’s one of my favorites.


I chose Breyer’s John Henry mold to customize as it already looks a lot like Nirvana.  This mold was originally intended to portray an old Thoroughbred, so he’ll need some tweaks to become a mustang and some repairs - the mold has odd hooves, and this particular model has a bent leg and doesn’t stand well.  He will get a new mane and tail, and a new, lowered neck, among other things.


I’ve been reading a great blog called Don’t Eat The Paint, and I’m going to try her neck sculpting technique for the first time.  So it’s off with his head!

Using a hacksaw and an assortment of files and rasps (because the Dremel is broken), I sawed off the tail, neck, ears, and his right eye (it was uneven…I may regret this later) and filed down the nostrils, mold mark, and rounded off any edges.
Also, with a little sanding on the bottom of the hooves, and no neck, this body stands quite nicely...for now.
 The hardest part of this step was actually gluing the armature wire into the body, because the only thing super glue ever glues instantly is skin.  After much messy dripping, and much dumping of baking soda everywhere, it stuck.  The wire attaches inside his withers and the top of his head.
An odd, flat neck is better than no neck, right?
 Then I stuck a few layers of masking tape over the armature wire, drew the shape of the neck, and cut it down to size.  Continuing to follow directions, I spread on an entire bottle of super glue, and some baking soda to stabilize it.  (The chemical reaction of liquid super glue and baking soda makes a hard, resin-like material.)

Next time, the scary part: sculpting the neck.  I'm aiming for 2-3 posts per week to start with, so part two should be up soon!

Thursday, December 1, 2011

Welcome to Atomic Stables!

Hello, and thanks for visiting!


One of the most enjoyable parts of showing model horses for me is making things myself.  You don't need to spend hundreds of dollars on someone else's stuff to win....the best feeling in the world is to look at an entry YOU made, knowing full well that your entire scene cost less than the next competitor's saddle alone.  Making your own tack, props and customized models allows you to have something truly unique, without paying the price of a professional commission.  It's not for the faint of heart, but it is satisfying.


I'm a fan of the unusual, so future posts will talk about things like harness entries - there's so much more than just pleasure harness!  "Other Performance" is also a favorite of mine.  I also make props - jumps, scenic bases for trail scenes, and more, and will show some of those techniques as well.  Harnesses, horse-drawn vehicles, saddles, and custom horses in Traditional and Stablemate scales are on my to-do list.

My first series of posts will detail the creation of Nirvana, a Traditional scale custom mustang.  He is a portrait model of one of my favorite horses I have known, and I will be trying out several techniques I have never done before.  So stay tuned!  The Nirvana project is coming soon!
(computer edited mockup of what's ahead!)